First of all, massive THANKS to every contributor on forums, without your work I wouldn’t have been able to revert my bricked SYNC3 APIM MY23.
How it started: I wanted a clean SYNC3 reinstall so that I update my FMods tools to the latest version. I saw that the F13 maps have been updated and considered I could try a reinstall because I’ve never done that.
At this point I want to say that my car is a Focus mk3 built in 2013. It had a factory SYNC1 with rear view camera standard, and I fitted a SYNC3 on it, kept the audio module and configured everything to be functional.
I got Syn3Updater and followed the instructions, created an update USB containing the SYNC3 desired packages (27GB worth of aps, voices, maps, etc). I read about the horrors of MY20 updates but hey, Syn3Updater has the check and should be safe, right? I was about to discover that no, not at all.
Not to bash on the developers of the tool, far from my intentions, it is of immense help! But I believe the fact that my setup was not standard messed its detection algorithm a bit and applied a wrong reformat method to the APIM.
I installed the stick, I got the update screen, said that part1 was a success then it said it needs rebooting for part 2 to continue. After it powered off there was no image on the screen anymore; not sure if backlight because it was bright out, but the screen was completely dead and not responding to touches.
I heard after the reboot only once “English language selected” and that was the last sign of life from my APIM.
I tried to reboot, to recreate the USB stick, but there was NO ACTIVITY on the USB ports, not even trying to detect it.
Then I connected Forscan and the module was communicating, tried to reset it but same behavior.
What followed was a day of internet searching and trying to understand what happened and if I have a chance to recover it or I am doomed to buy a new APIM, just like many others before me.
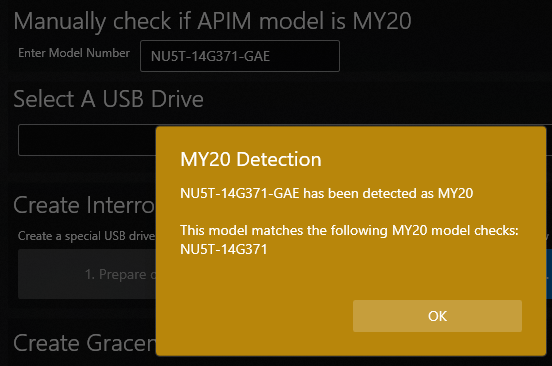
Looking in the update_status.txt on the stick, I saw that Syn3Updater did not identify my APIM the correct way (even tho it’s present in the database, NU5T-14G371-GAE) and also got the date wrong (not sure if it matters):
[quote]Please insert USB stick…
Searching for update packages…
Reformat install start
Thu Jan 01 00:01:24 UTC 1970
Found update packages on USB stick…
Repartitioning eMMC…
ERROR: Unknown platform
DBG: Size: Platform[61071360]-nand[62095360]
ERROR: calculating NAND size error:-1
Failed to partition eMMC Method 1…
DBG: Size: Platform[62095360]-nand[62095360]
DBG: Partitioning hd0 3
ERROR: DBG: MY_Version = 1850[/quote]
Long story short: there are 2 versions of NAND/eMMC and 2 versions of display drivers for the SYNC3 APIM. That is the difference between before MY20 and after.
If you use the “official update method” that applies to older MY on the newer ones, you lose the LCD drivers and also it is unable to correctly partition the NAND.
Unpacking the NU5T-14G381-AD_1689364279000.TAR.GZ file from the USB showed it contained MLO (first part) and QNX-IFS (the part with drivers and File System partitioning intrustions - ~3MB in size!!!) files.
This file contains a Version.der certificate, meaning any alteration of the tar.gz will be rejected as a valid update package since the certificate will no longer match the Hash of the package.
What does this mean? You cannot use the old way with new files, since we do not have a way to sign the certificate and trick SYNC3 to allow update → it will use old QFN-IFS which will brick the APIM.
Luckily there is a way to recover all types of APIM versions using sync3flash (BIG THANKS to bigunclemax): https://github.com/bigunclemax/sync3flash
There is a long detailed explanation of how it works here https://gist.github.com/bigunclemax/c566ecfc2f6d92e76e68446e46bdd944
But the howto addresses a way to recover bricked APIM older than MY20, it uses the file QNX-IFS-REFORMAT to do this and the provided links to “REFORMAT MOD (1U5T-14G386-CB) v1.3.zip” contain a version having 9.3MB which I found out it’s not right in my case (details below).
There are 2 pictures in the post that describe opening the APIM and having to short 2 pads (the one with transistor installed is simmilar with what I had and it was the right one to use) that force the processor to go into a recovery mode and be detected by a computer connected to it’s mini usb port.
The short needs to be on the V31 pin and GND while powering it up and having CAN signals that send messages to wake it up. So clearly it needs to be done in the vehicle for people that do not have a test bench simulating CAN and other requirements.
For this I found the pin, saw where on the case it matches, drilled a hole in the aluminium case and fitted a switch so I can play safely with it inside the car.
I started the terminal, put the files in the sync3flash folder as instructed then I tried to see if the switch makes the APIM detectable. Command “lsusb” lists current devices but on my case the devide was being detected then disconnected very fast, no way to see it like that. But I used command “dmesg | tail -n 20” to see the history and it was clearly detected then disconnected 3 seconds later:
[quote][30403.967725] usb 1-2: new high-speed USB device number 22 using xhci_hcd
[30404.092288] usb 1-2: New USB device found, idVendor=0451, idProduct=d011, bcdDevice= 0.00
[30404.092305] usb 1-2: New USB device strings: Mfr=33, Product=37, SerialNumber=0
[30404.092312] usb 1-2: Product: OMAP5430
[30404.092317] usb 1-2: Manufacturer: Texas Instruments
[30404.505453] [UFW BLOCK] IN=wlo1 OUT= MAC= SRC=fe80:0000:0000:0000:26cd:9ba4:209e:e4c5 DST=ff02:0000:0000:0000:0000:0000:0000:000c LEN=655 TC=0 HOPLIMIT=1 FLOWLBL=150563 PROTO=UDP SPT=43973 DPT=3702 LEN=615
[30407.094253] usb 1-2: USB disconnect, device number 22[/quote]
So then you need to start the sync3flasher because it waits for the OMAP5430 and automatically starts the flashing.
I tried with the switch on (V31 to GND permanently) as read but I was facing an error writing the second part:
[quote]command: sudo ./sync3flash -i QNX-IFS-REFORMAT -m MLO
waiting for device…
reading ASIC ID
CHIP: 5430
rom minor version: 02
IDEN: 0000000000000000000000000000000000000000
MPKH: 0000000000000000000000000000000000000000000000000000000000000000
CRC0: 071a9a31
CRC1: 00000000
device is GP
sending 2ndstage to target…
waiting for 2ndstage response…
unexpected 2ndstage response[/quote]
Then I tried to remove the V31 to GND short when I saw “sending 2ndstage to target…” and success! The processor flashed:
[quote]command: sudo ./sync3flash -i QNX-IFS-REFORMAT -m MLO
waiting for device…
reading ASIC ID
CHIP: 5430
rom minor version: 02
IDEN: 0000000000000000000000000000000000000000
MPKH: 0000000000000000000000000000000000000000000000000000000000000000
CRC0: 071a9a31
CRC1: 00000000
device is GP
sending 2ndstage to target…
waiting for 2ndstage response…
sending image to target…size (22696-B/22-KB/0-MB)
sending image to target…size (9279956-B/9062-KB/8-MB)[/quote]
After this process finishes it takes 30 seconds for the SYNC3 to restart itself and an image should be displayed. No luck in my case, same brick state as before.
There is a tool in Fmods site that has the function of reformatting the SYNC3 but, it needs to be working and it needs to be Jailbroken: Universal Reformat (SyncRenovation) https://www.fmods.net/community/dlext/details?df_id=24 or the github directly https://github.com/ig0ist/SyncRenovation/
My SYNC3 was already jailbroken from before but I am not sure at this stage that still matters or not, perhaps someone else could verify. I would suspect not, because this flashing is done low level and there is no certificate checking involved, only raw data bytes sent.
I downloaded this tool and looked inside I saw the files: MLO and QNX-IFS-REFORMAT with 10.1MB!!! I had hope and copied the 2 files in my sync3flas folder, then restarted the procedure above:
[quote]1. with the car and SYNC off, flip the switch to short V31 to GND
2. connect LINUX laptop to APIM miniUSB port directly
3. in terminal type “sudo ./sync3flash -i QNX-IFS-REFORMAT -m MLO” → you should see the text “waiting for device…”
4. press button or turn ign key so that the SYNC3 is started and keep the hand on the switch ready to remove short from V31 and GND
5. you will see the text in above logs and when you see “sending 2ndstage to target…” flip the switch to remove the short
6. you will see the images being sent:
sending image to target…size (22696-B/22-KB/0-MB)
sending image to target…size (10118104-B/9880-KB/9-MB)
7. wait 30 seconds for APIM to reboot
8. SUCCESS! Image on the screen from SyncRenovation and message “Please insert USB stick…”[/quote]
Now you need to understand that the APIM is in reformat mode and is only accepting USB stick that contains your apps, voices, gracenotes, maps images that you got with Syn3Updater on the initial stick that bricked your device, but with a catch! APIM is no longer waiting for the autoinstall.lst file that tells it how to “normal install” we are past that.
Now the APIM is waiting for the file reformat.lst that also exists on this already prepared stick. Just DELETE the autoinstall.lst (not sure if mandatory but I did that)
Connect back the USB hub from the car since laptop is no longer needed, keep the car running and insert the USB stick.
Engine needs to be running so that SYNC3 would not turn off during the update process and it takes some time, depending on what you selected. For my 27GB I waited somewhere between 45 and 60 minutes.
When it’s finished you remove the USB and SYNC3 restarts in fully working order! AS-BUILT data was not erased, everything was back to normal.
This was my experience, hopefully it can help someone else!
Also a shout out to TxF from fordescape forum! His post (https://www.fordescape.org/posts/1201739/) was about some maps switch but it helped paint the picture of the images and how it works.
SYNC Region: EU
Navigation Variant: Nav
Manufacturer Year: MY20
Install Type: Retrofit
Old SYNC Version: 3.4.23188
New SYNC Version: 3.4.23188
Do you have a error message, if so what is it?
BRICK: No image, no sound, no USB activity
Update Method: CyanLabs Syn3 Updater
Syn3 Updater Version: 2.12.0.0
Syn3 Updater Documentation Read: yes
Syn3 Updater Log File
No longer have the full logs but I am posting a tutorial