Updating Firmware and Initial Setup – OBDLink EX in FORScan.
NOTE: Before using your OBDLINK EX for the first time with FORScan, you must install the latest FTDI Virtual COM Port Drivers and update the adapter firmware to the latest version. Ensure you update using a computer with a reliable power source.
FTDI Virtual COM Port Driver Installation (OBDLINK download):
- You will need to install the FTDI drivers before you connect the OBDLINK EX for the first time with your computer. Go to OBDLink® EX Support - Drivers and download the latest available version of the FTDI drivers. (CDM21228_Setup is the current FTDI driver version included in the OBDLINK EX FTDI driver package which contains Windows 7 thru 11 drivers.)
- Once downloaded, extract the downloaded file to its own folder.
- Find the CDM21228_Setup.zip file and extract the file to its own folder.
- Run the CDM21228_Setup.exe installation file.
FTDI Virtual COM Port Driver Installation (FTDI Chip drivers):
- You will need to install the FTDI drivers before you connect the OBDLINK EX for the first time with your computer. Go to Drivers - FTDI (ftdichip.com) to download the latest versions of the FTDI drivers. (CDM212364_Setup is the current FTDI driver version as of July 2022 which contains Windows 7 thru 11 drivers.)
- Once downloaded, extract the downloaded file to its own folder.
- Follow the instructions above to install the drivers.
Upgrading your OBDLink EX (USB) to the Latest Firmware. (Up to Version 5.6.19)
STN Firmware Updater v1.6.4
NOTE: This method is only for firmware Version 5.6.19 and below.
Firmware Update:
- Go to ScanTool.net, LLC - Firmware Updates for OBDLink EX and download the latest available version for the OBDLink EX.
- Once downloaded, unzip the downloaded file to its own folder.
- Open StnFirmwareUpdater.exe.
- It is advisable that no other USB devices are connected to your computer. Select the correct COM port where the OBDLink EX is connected. If there are multiple usb devices connected to your pc, you will need to determine which one is correct from the Device Manager.
- Set the baud rate to ‘AUTO’
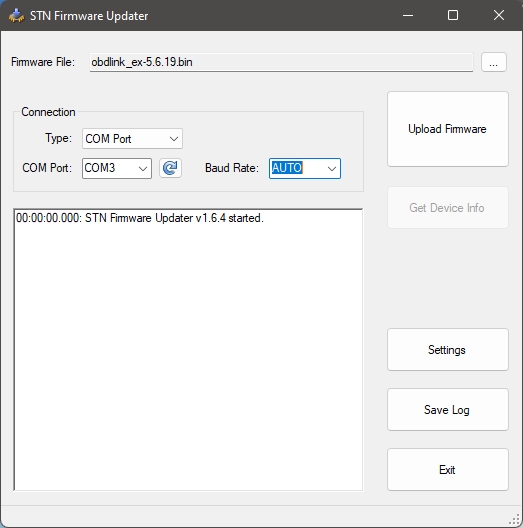
- Select the Settings button, open the settings dialogue. The settings should appear as shown. This is the default setup for the OBDLink EX adapter.
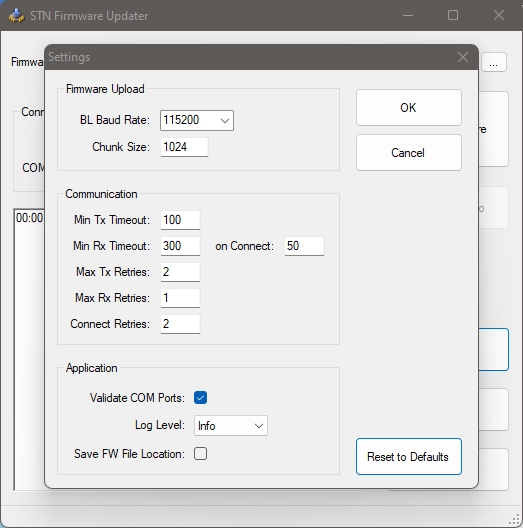
- Select OK to close settings.
- Click Upload Firmware and allow it to update.
- Once complete, exit the Updater.
Upgrading your OBDLink EX (USB) to the Latest Firmware. (Version 5.6.24 onward)
STN Firmware Updater v2.1.2
NOTE: This method will supersede the previous method above for firmware versions 5.6.24 onward.
Firmware Update:
- Go to ScanTool.net, LLC - Firmware Updates for OBDLink EX and download the latest available version for the OBDLink EX.
- Once downloaded, unzip the downloaded file to its own folder.
- Select the Link to StnFirmwareUpdater.
- Download the STN Firmware Updater v2.1.2. If you see that the download is blocked by the browser, select Keep Anyways from the download menu.
- Open the STN Firmware Updater v2.1.2 installer. If you see that the installation is blocked by the Windows, select Run Anyways from the More menu. Install in the default folder defined in the dialogue.
- Open the STN Firmware Updater v2.1.2.
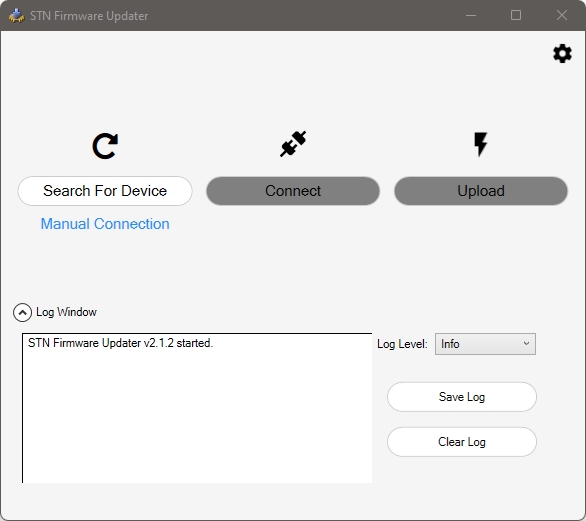
- Select the Settings button, open the settings dialogue. The settings should appear as shown. This is the default setup for the OBDLink EX adapter.
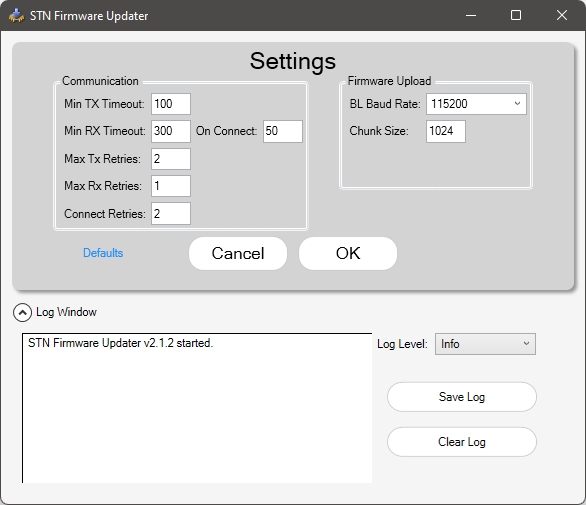
- Select OK to close settings.
- Select Connect to OBDLink EX.
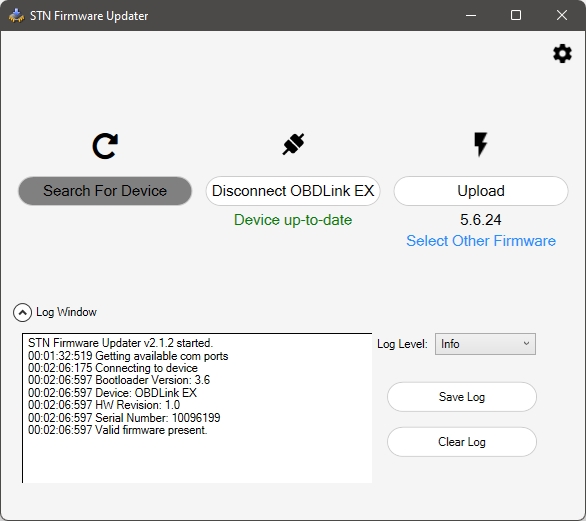
- If the device is up to date, the installer will note this as shown. Otherwise, select Upload to upgrade the firmware.
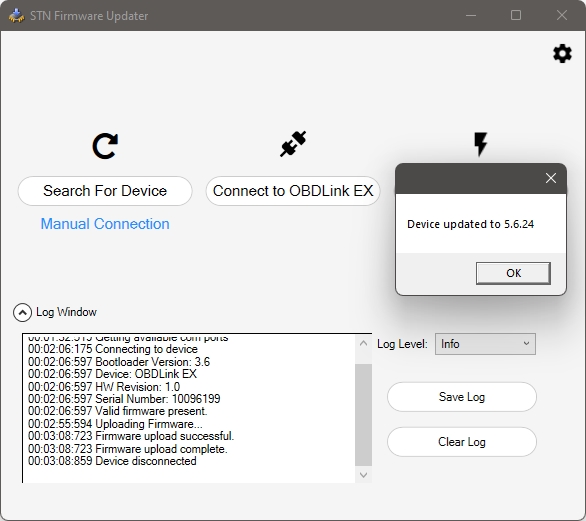
- Once complete, exit the Updater.
Set up the OBDLink EX adapter in FORScan.
Before using your OBDLINK EX for the first time with FORScan, you must update the connection settings.
- Connect the OBDLink EX to the computer.
- Open FORScan. FORScan will open in the Vehicle and Interface Information page.
- Go to the Settings page.
- In the General tab, ensure Demo mode is NOT checked. Leave the Debug mode checked so you can log activities.
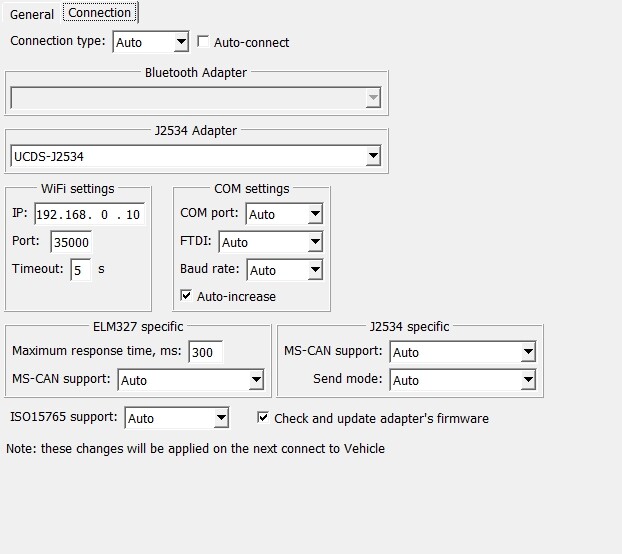
- Select the Connections tab. The settings here should be exactly as shown.
- Go back to the Vehicle page.
- Select Connect to Vehicle at the bottom of the page.
- FORScan will check for the adapter and list the connection and adapter type. At this point you will not have a profile set up for the vehicle if this is the first time connecting. Make a profile at this point. FORScan will create the profile and automatically name it with the VIN included. If you work on multiple vehicles, it’s a good idea to keep the VIN included. You can make multiple profiles for different or the same vehicles.
- The next stop is the DTC page. Make this a habit to always check the DTC status as this can prevent you from making asbuilt or firmware changes in certain modules. Clear the DTC’s and rescan to ensure the vehicle health before you start modifying things.
See the FORScan tutorials at FORScan Tutorial Links - Ford / Information for more information on the use of FORScan.